@DeletedUser41350843 (talk | contribs) |
Tag: Visual edit |
||
| (19 intermediate revisions by 5 users not shown) | |||
| Line 1: | Line 1: | ||
| + | == Menu Layout == |
||
| − | The gameplay of '''[[{{Gamename}}]]''' follows certain conventions and '''mechanics'''.[[Category:Gameplay]][[Category:Mechanics]] |
||
| − | ==Suit Evolution (Rank C to Rank S3) == |
||
| − | Evolution is the means to upgrade the rank of your suit. It needs 2 suits of the same grade at maximum level to do, of which one suit being the one to be evolved and the other being the evolution fodder material. Evolution also need other materials such as Crux Crystals and credits. |
||
| + | [[File:Main Page.jpg|frameless]] |
||
| − | After the evolution, the suit will become a level 1 of the next rank and is weaker compared to the max level of the pre-evolved suit. The evolved suit will need a fair amount of levelling up before it would become stronger than its pre-evolved counterpart. |
||
| + | === Top Left Corner === |
||
| − | The fodder suit can be of different class than the evolving suit, it simply need to be of the same grade at its maximum level. |
||
| + | '''Player Level:''' |
||
| − | [[File:Evo1.png|500px]] |
||
| + | * The current max level is 40. |
||
| − | When a Preferred suit is evolved, it will rank up into the same unit of the next rank. A level 20 A-grade Standard Magata will evolve into a level 1 S-grade Mass Produced Magata with higher max level and better skills. |
||
| + | * When you reach a new level, your AP/BP will be fully recovered and your max AP goes up by 3. |
||
| − | When a Graded (non-Preferred) suit is evolved, it will rank up into a random unit of the same class. There is no guarantee that the evolved suit will have the same type of skills as it had before it ranked up. |
||
| + | * Player level determines your ‘suggested friends’. High level player has higher chance to see a strong suit in random suggestion, before starting a mission. |
||
| − | The upgraded suit will retain the parts it had before it is evolved. The parts that was equipped in the fodder suit will disappear. |
||
| − | == |
+ | === Mid-Top === |
| − | The next step after evolving your suits to rank S3 is to modify them. Just like evolution, modification will extend the maximum level of the suit and give it better skills. Unlike evolution, modification does not reset the suit level to 1 and will, instead, give the suit one extra level. |
||
| + | '''[[Beginner's_Guide#AP (Action Points)|AP (Action Points)]]:''' |
||
| − | To do a modification, you will need an S3 unit at its maximum level, several modification materials, S3 Crux Crystals and a sum of credits. |
||
| + | * This might be known as stamina or play points. You need this to play in all game modes besides Simulator and Battlefield. |
||
| − | This is an example of modification. The suit is an assault type and is being modified to +1. The materials it needs are: 15 Titanium Armor (Primary Material), 9 Nitinol (Secondary Material), 3 Launcher booster (Tertiary Material), 3 EMP Booster (Tertiary Material) |
||
| + | * 2 AP is recovered every 5 minutes. |
||
| − | [[File:Magata Mod 1.png|500px]] |
||
| + | '''BP (Battle Points):''' |
||
| − | The materials needed for modifications are (credit goes to Leollyn): |
||
| + | * This is used for playing in the Battlefield. |
||
| − | +1 : 15 S3 Crux, 15 primary material, 9 secondary material, 3 tertiary material, 3 tertiary material, 377000 credits |
||
| + | * BP can be restored using BP potions from the shop. |
||
| − | +2 : 20 S3 Crux, 20 primary material, 12 secondary material, 4 tertiary material, 4 tertiary material, 439000 credits |
||
| + | * 1 BP is recovered every 30 minutes |
||
| − | +3 : 25 S3 Crux, 25 primary material, 15 secondary material, 5 tertiary material, 5 tertiary material, 502000 credits |
||
| + | '''[[Beginner's_Guide#Credit|Credit]]''' |
||
| − | [Assault] Primary: Titanium Armor, Secondary: Nitinol, Tertiary: Launcher booster/EMP Booster |
||
| + | * Credits are the main currency for suit development |
||
| − | [Bombardier] Primary: Launcher Booster, Secondary: EMP Booster, Tertiary: Titanium Armor/Nitinol |
||
| + | * Credits can be earned by completing missions and from Daily Challenges |
||
| − | [Support] Primary: Nitinol, Secondary: Launcher Booster, Tertiary: Titanium Armor/EMP Booster |
||
| + | '''[[Beginner's_Guide#Gem|Gem]]''' |
||
| − | [Sniper] Primary: EMP Booster, Secondary: Titanium Armor, Tertiary: Launcher booster/Nitinol |
||
| + | * Gems are the premium currency of the game: |
||
| − | ==Rank US Suit Evolution== |
||
| − | To evolve a suit to US rank, a level 45 S3+3 suit is needed. The materials needed are: Evolution Mini-Mini, S3 Crux Crystal, Rebellion Crux (according to the class) and credits. |
||
| + | * Everything can be bought with gems from items, more entries to missions/special maps, credits, you name it. |
||
| − | There are 2 types of US evolution mini-minis: High Quality Evolution Mini-Mini (HQ Mini) and Brand Evolution Mini-Mini (Brand Mini). |
||
| + | * Not recommended: Also used for drawing suits, commonly known as the “gacha”. |
||
| − | To evolve a Preferred suit, you will need an HQ Mini of the same class. This needs 30 S3 Crux Crystals, 40 Rebellion Cruxes and 457000 credits. |
||
| + | * There will be a section on how to spend your gems down below. |
||
| − | You cannot use Brand Mini to evolve a Preferred suit. |
||
| + | === Top Right Corner === |
||
| − | To evolve a Graded suit, you can use HQ mini to get a random graded US rank suit of the same class. This will need 30 S3 Crux Crystals, 40 Rebellion Cruxes and 457000 credits. |
||
| + | '''Mail Box:''' |
||
| − | You can also use a Brand Mini to evolve a Graded Suit into a specific US suit according to the Brand Mini. This will need 30 S3 Crux Crystals, 50 Rebellion Cruxes and 457000 credits. |
||
| + | |||
| + | * This is where you collect various items from events and rewards. |
||
| + | |||
| + | '''[[Beginner's_Guide#Friendship Point|Friends List]]:''' |
||
| + | |||
| + | * This is a list of your friends. Adding a friend will allow you to take them to battle once a day. This will be further explained in detail below. |
||
| + | |||
| + | '''Sub Menu:''' |
||
| + | |||
| + | [[File:Sub Menu.jpg|frameless]] |
||
| + | |||
| + | * You're recommended to checked out the “Help” section. It contains simple to understand tutorials on the basis of this game with cute art. |
||
| + | * In the Gallery, you can replay the main two cut-scenes (The anime Intro and Prologue). |
||
| + | |||
| + | === Right Side === |
||
| + | |||
| + | '''Codex:''' |
||
| + | |||
| + | * Contains the current list of available suits and their stats. |
||
| + | |||
| + | * Contains lore regarding suits and how individual Pixies think about their preferred suits. |
||
| + | |||
| + | * There is no gameplay feature to this. It’s mostly for people who like seeing what suits are available, and what suits can be collected. |
||
| + | |||
| + | '''Team:''' |
||
| + | |||
| + | * This is where you organise your teams. |
||
| + | |||
| + | * Three different teams are available for Normal missions, named ABC |
||
| + | This is also where you can change the suit a pixie pilots. |
||
| + | |||
| + | * Teams used in Battlefield, named α and β are changed here as well. |
||
| + | |||
| + | '''Hangar:''' |
||
| + | |||
| + | * This is where are your [[suits]], [[parts]], [[pixies]] and [[items]] are. |
||
| + | |||
| + | '''Special Missions:''' |
||
| + | |||
| + | * There are currently five different game modes under Special Missions. |
||
| + | |||
| + | * [[Daily Missions|Daily Mission]]: as the name implies, give daily missions, this is also where you find timed quick events. |
||
| + | |||
| + | * [[Temples]]: are your main sources of Crux crystal, needed for evolutions and for getting high quality weapons and parts; and EXP/item farming. |
||
| + | |||
| + | * [[Simulator]]: is unlocked by beating the 5-5 story mission and is the only way to acquire Genic Seed materials. |
||
| + | |||
| + | * [[Operations]]: are special missions that rewards a Pixie upon completing four difficult stages. |
||
| + | |||
| + | * Battlefield: is a DPS-race where only a certain combination of Pixies can be used. This is where BP is used. Further details will be covered as well. |
||
| + | |||
| + | '''[[Missions]]:''' |
||
| + | |||
| + | The main bulk of the game is here. See how the plot develops and get Pixies and gems by completing missions. Story missions have a neat storyline and normal missions are where you farm for resources/materials. |
||
| + | |||
| + | === Bottom Left === |
||
| + | |||
| + | '''Pixie Room:''' |
||
| + | |||
| + | * This is where you can interact with your Pixies, give gifts and play their episodes. You unlock new Pixies by using hearts (another currency). Details on how to get hearts, and the requirements for each Pixie, and the episode guides will be covered in-depth below. |
||
| + | |||
| + | '''Shop:''' |
||
| + | |||
| + | * The shop has it all. A guide on making smart shopping decisions will also be posted below (real money tips included for you small-time payers and whales). |
||
| + | |||
| + | '''Challenge:''' |
||
| + | |||
| + | * This is where your quests are. There are three types of quests: |
||
| + | |||
| + | * Daily quests that features the same quests everyday. |
||
| + | |||
| + | * Day of the Week quests that features unique quests and rewards depending on what day of the week is. |
||
| + | |||
| + | * Note: Both types of daily quest gives out rewards based on how far you are in the story. |
||
| + | |||
| + | * Repeat challenges are indefinite quests that have tiers. Can be completed anytime, anywhere |
||
| + | |||
| + | === Mission Operations === |
||
| + | |||
| + | ===== Auto Battle Mode ===== |
||
| + | Daily missions and Chapter Missions that appear in Blue in the Chapter list can be set to auto-battle. In Auto-play, the game AI makes move on your behalf. To turn auto-play on and off, you select the Auto icon in the top right of the battle screen or you can select the auto icon in the bottom right of the team selection screen prior to the battle. When in auto-battle mode, team members cannot be resurrected. |
||
| + | |||
| + | ===== Cheer-Up Points ===== |
||
| + | A Cheer-Up meter is displayed at the top right of the battle screen. Cheer-up points are required for your Pixie's to use their special abilities, their 4th skill. Each time an enemy is killed there is a chance that each awakened Pixie will contribute 10 cheer-up points. At the start of each battle you begin with 30 cheer-up points per awakened Pixie on your team, up to a maximum of 120 points. |
||
| + | |||
| + | ===== Rotate Screen ===== |
||
| + | In the top right of the battle screen mode, you will find a rotate screen button. This can be used to rotate the 3D view by 90 degrees. Each time you press the button the screen will be rotated another 90 degrees. Pressing the button 4 times will return the screen to the original view. |
||
| + | |||
| + | ===== Select Unit ===== |
||
| + | During manual battle play (auto-battle turned off) you may press the Select Unit button to cycle through your Pixies who still have a move left in this turn. In some cases, it may be strategic to move your Pixies in a different order than they appear on your team. For instance, a Pixie may be blocking another Pixie from reaching a desired location and you need to move that Pixie out of the way first. It may also be advantageous to you to use a Pixie with a lower-attack power to end a particular level in a multi-level mission, so that your more powerful Pixies will still be available to act when they arrive at the new level. |
||
| + | |||
| + | ===== Speed-Up Battle ===== |
||
| + | In the top right of the battle screen between the Auto button and the Rotate Screen button you will find a button that accelerates the action . Pressing the button will cycle between speed-up and normal speed. After playing the first few missions, you may find it is useful to leave the speed-up on. |
||
| + | |||
| + | ===== Wait ===== |
||
| + | In the bottom right of the battle screen you will find a large Wait button. This button ends a Pixie's turn. There are times when you may need to end a Pixie's turn without moving or acting. This button will allow you to proceed. Once you press Wait, the currently active Pixie's turn has ended for this round and she must wait until the next round to move or attack. Note that you can use the Select Unit button to cycle through your Pixies if you need a particular Pixie to move or attack later in the same turn, rather than ending their turn. |
||
Latest revision as of 20:21, 28 March 2019
Menu Layout[ | ]
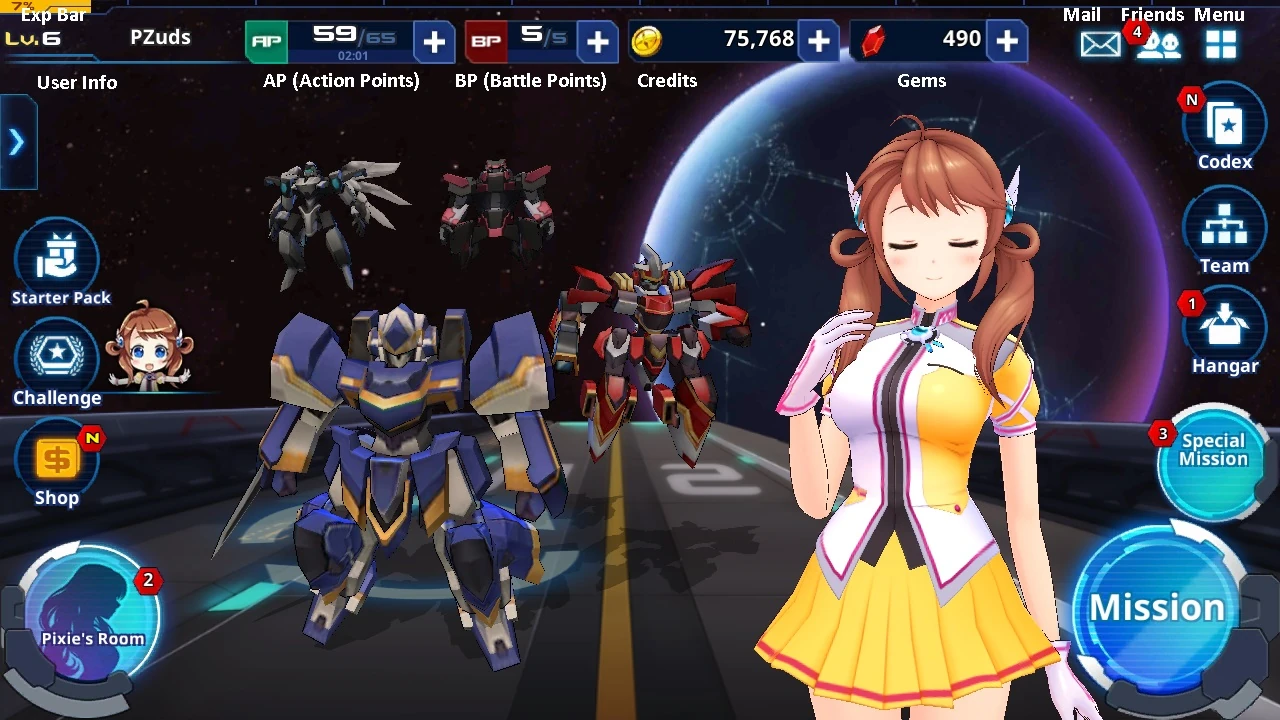
Top Left Corner[ | ]
Player Level:
- The current max level is 40.
- When you reach a new level, your AP/BP will be fully recovered and your max AP goes up by 3.
- Player level determines your ‘suggested friends’. High level player has higher chance to see a strong suit in random suggestion, before starting a mission.
Mid-Top[ | ]
- This might be known as stamina or play points. You need this to play in all game modes besides Simulator and Battlefield.
- 2 AP is recovered every 5 minutes.
BP (Battle Points):
- This is used for playing in the Battlefield.
- BP can be restored using BP potions from the shop.
- 1 BP is recovered every 30 minutes
- Credits are the main currency for suit development
- Credits can be earned by completing missions and from Daily Challenges
- Gems are the premium currency of the game:
- Everything can be bought with gems from items, more entries to missions/special maps, credits, you name it.
- Not recommended: Also used for drawing suits, commonly known as the “gacha”.
- There will be a section on how to spend your gems down below.
Top Right Corner[ | ]
Mail Box:
- This is where you collect various items from events and rewards.
- This is a list of your friends. Adding a friend will allow you to take them to battle once a day. This will be further explained in detail below.
Sub Menu:
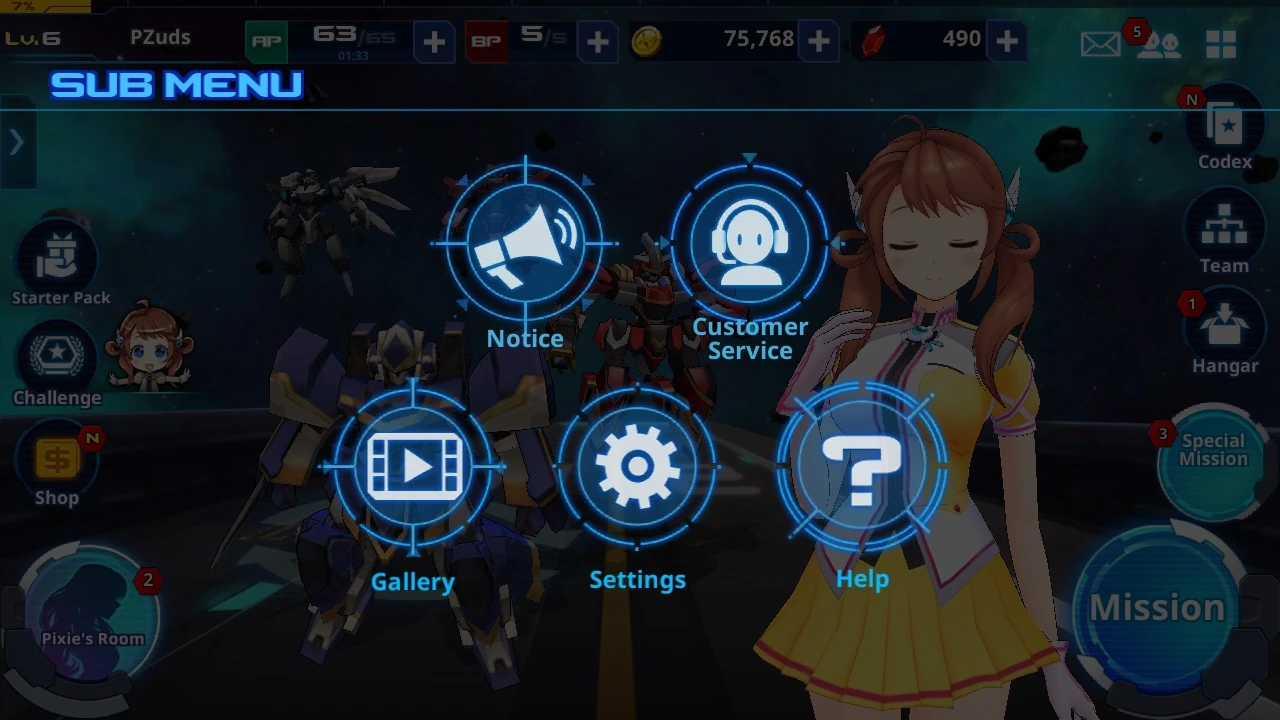
- You're recommended to checked out the “Help” section. It contains simple to understand tutorials on the basis of this game with cute art.
- In the Gallery, you can replay the main two cut-scenes (The anime Intro and Prologue).
Right Side[ | ]
Codex:
- Contains the current list of available suits and their stats.
- Contains lore regarding suits and how individual Pixies think about their preferred suits.
- There is no gameplay feature to this. It’s mostly for people who like seeing what suits are available, and what suits can be collected.
Team:
- This is where you organise your teams.
- Three different teams are available for Normal missions, named ABC
This is also where you can change the suit a pixie pilots.
- Teams used in Battlefield, named α and β are changed here as well.
Hangar:
Special Missions:
- There are currently five different game modes under Special Missions.
- Daily Mission: as the name implies, give daily missions, this is also where you find timed quick events.
- Temples: are your main sources of Crux crystal, needed for evolutions and for getting high quality weapons and parts; and EXP/item farming.
- Simulator: is unlocked by beating the 5-5 story mission and is the only way to acquire Genic Seed materials.
- Operations: are special missions that rewards a Pixie upon completing four difficult stages.
- Battlefield: is a DPS-race where only a certain combination of Pixies can be used. This is where BP is used. Further details will be covered as well.
The main bulk of the game is here. See how the plot develops and get Pixies and gems by completing missions. Story missions have a neat storyline and normal missions are where you farm for resources/materials.
Bottom Left[ | ]
Pixie Room:
- This is where you can interact with your Pixies, give gifts and play their episodes. You unlock new Pixies by using hearts (another currency). Details on how to get hearts, and the requirements for each Pixie, and the episode guides will be covered in-depth below.
Shop:
- The shop has it all. A guide on making smart shopping decisions will also be posted below (real money tips included for you small-time payers and whales).
Challenge:
- This is where your quests are. There are three types of quests:
- Daily quests that features the same quests everyday.
- Day of the Week quests that features unique quests and rewards depending on what day of the week is.
- Note: Both types of daily quest gives out rewards based on how far you are in the story.
- Repeat challenges are indefinite quests that have tiers. Can be completed anytime, anywhere
Mission Operations[ | ]
Auto Battle Mode[ | ]
Daily missions and Chapter Missions that appear in Blue in the Chapter list can be set to auto-battle. In Auto-play, the game AI makes move on your behalf. To turn auto-play on and off, you select the Auto icon in the top right of the battle screen or you can select the auto icon in the bottom right of the team selection screen prior to the battle. When in auto-battle mode, team members cannot be resurrected.
Cheer-Up Points[ | ]
A Cheer-Up meter is displayed at the top right of the battle screen. Cheer-up points are required for your Pixie's to use their special abilities, their 4th skill. Each time an enemy is killed there is a chance that each awakened Pixie will contribute 10 cheer-up points. At the start of each battle you begin with 30 cheer-up points per awakened Pixie on your team, up to a maximum of 120 points.
Rotate Screen[ | ]
In the top right of the battle screen mode, you will find a rotate screen button. This can be used to rotate the 3D view by 90 degrees. Each time you press the button the screen will be rotated another 90 degrees. Pressing the button 4 times will return the screen to the original view.
Select Unit[ | ]
During manual battle play (auto-battle turned off) you may press the Select Unit button to cycle through your Pixies who still have a move left in this turn. In some cases, it may be strategic to move your Pixies in a different order than they appear on your team. For instance, a Pixie may be blocking another Pixie from reaching a desired location and you need to move that Pixie out of the way first. It may also be advantageous to you to use a Pixie with a lower-attack power to end a particular level in a multi-level mission, so that your more powerful Pixies will still be available to act when they arrive at the new level.
Speed-Up Battle[ | ]
In the top right of the battle screen between the Auto button and the Rotate Screen button you will find a button that accelerates the action . Pressing the button will cycle between speed-up and normal speed. After playing the first few missions, you may find it is useful to leave the speed-up on.
Wait[ | ]
In the bottom right of the battle screen you will find a large Wait button. This button ends a Pixie's turn. There are times when you may need to end a Pixie's turn without moving or acting. This button will allow you to proceed. Once you press Wait, the currently active Pixie's turn has ended for this round and she must wait until the next round to move or attack. Note that you can use the Select Unit button to cycle through your Pixies if you need a particular Pixie to move or attack later in the same turn, rather than ending their turn.