General Information
- Parts are divided into 3 categories are Attack, Defense and Utility.
- Each suit can only equip 1 part of each category.
- Equipped part cannot be removed, but can be replace by equipping a new part of the same category.
Rarity
- Rarity of parts range from C to S3.
- Higher rarity part has better stats and more stat lines
- Normal enemy can drop C to A parts. Elite enemy can drop B to S parts. Boss enemy can drops S to S3 parts
Level
- Later chapters/temples drop parts with higher level than the previous one.
- Higher level part has better stat and bonus attached than the lower one.
- Higher Level part is usually better than lower level part even with the higher quality. (e.g. lv.81 S part could be better than lv 61 S3 part)
Enhancement
Parts can be enhanced to improve their stats and bonus options.
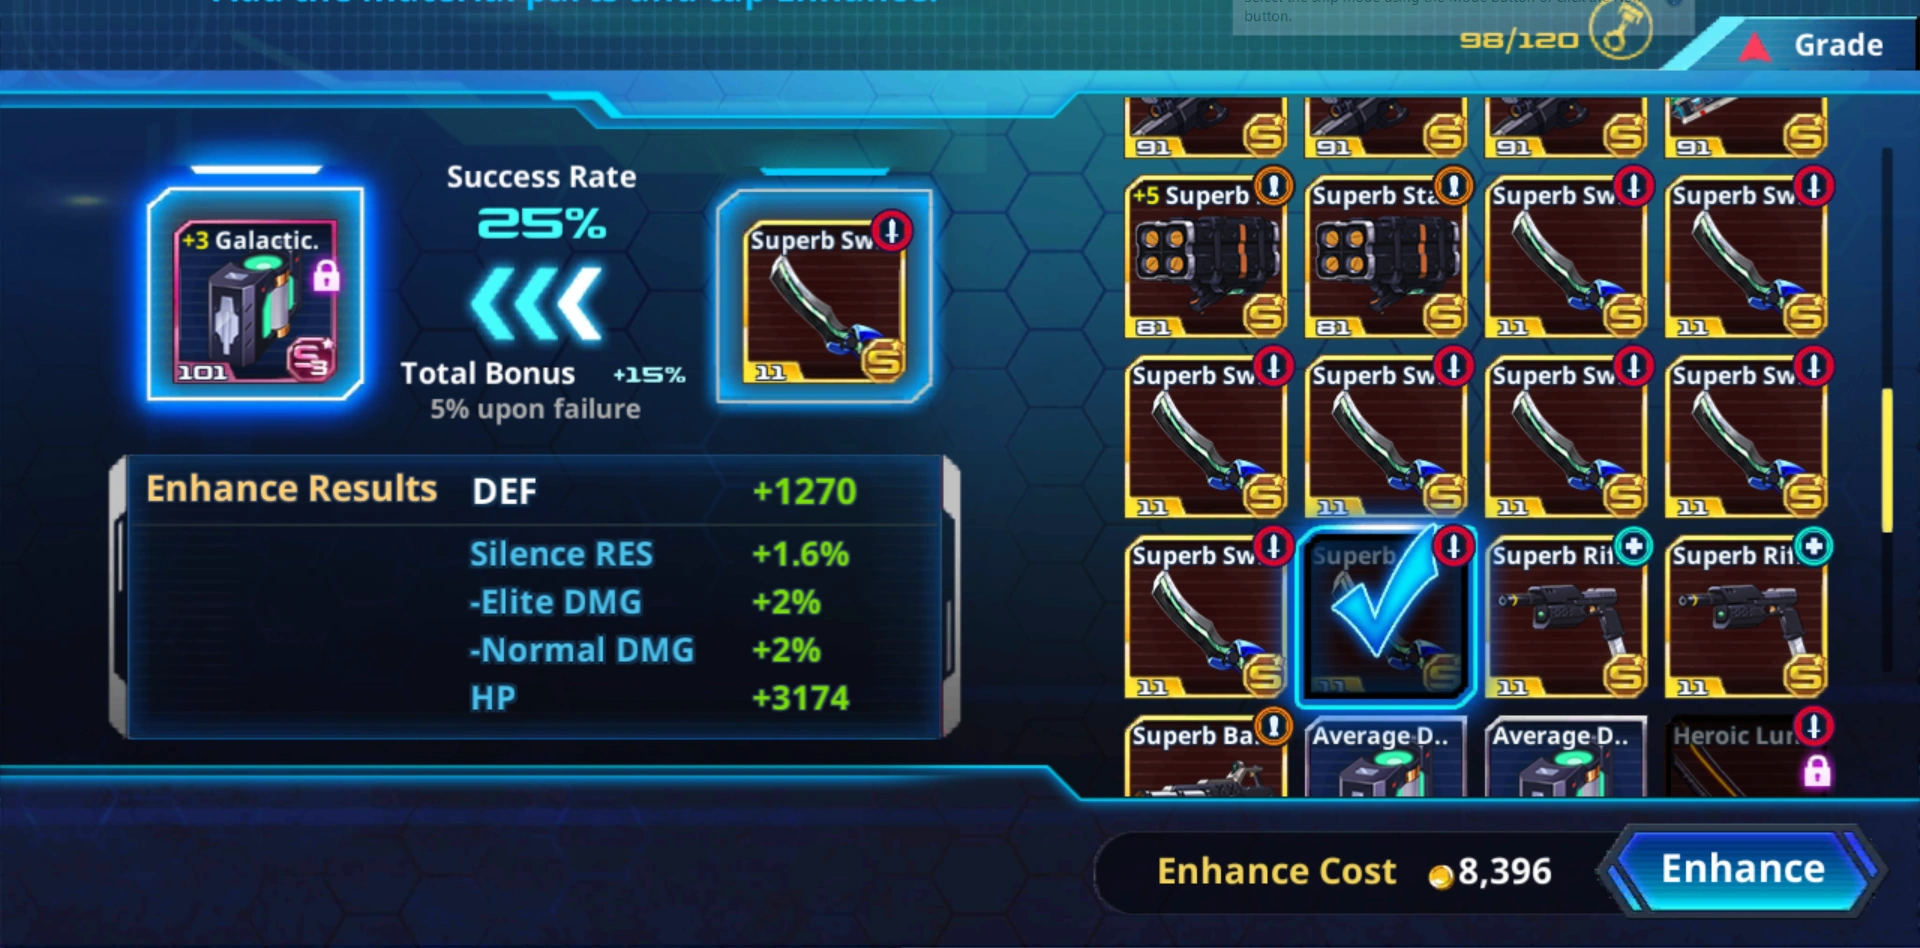
The cost to enhance a part is another part of the same or lower rank and a few credits. Using a part of a lower grade to feed an enhancement will give a chance for the enhancement to fail. When an enhancement has failed, the next enhancement on said part will have a small bonus success rate that can stack additively upon each failure.
The success rates of an enhancement and their upon-failure bonus, based on the fodder part grade are as follows:
The same grade: 100% success rate
1 grade below: 50% success rate, 10% bonus upon failure
2 grades below: 25% success rate, 5% bonus upon failure
3 grades below: 10% success rate, 2% bonus upon failure
4 grades below: 5% success rate, 1% bonus upon failure
A part cannot be enhanced with a fodder part that is 5 grades below. Thus, a C grade part cannot be used to enhance an S3 part.
Upon each successful enhancement, the parts’ stats and bonus options will improve by 10% of their base number. The parts name will also have +# added to it, with # being the number of successful enhancement the parts had undergo. Each part can only be enhanced 5 times, so a +5 part with 50% bonus to their base stats is the limit to how far it can improve.
Recommended Bonus
Table below presents the recommended bonus on part for a general propose. Please, keep in mind that some pixies/suits might require a different setup.
| Attack | Defence | Utility | |
|---|---|---|---|
| 1 | CNTR | Normal DMG | CNTR |
| 2 | Penetration | Elite DMG | ATK |
| 3 | ATK | Boss DMG | HP |
| 4 | CRT% | HP | Accuracy |
| 5 | DMG vs Normal | DEF | DEF |
| 6 | Accuracy | Stun RES | STNΩ |
| 7 | DMG vs Elite | Acid RES | ACDΩ |
| 8 | DMG vs Boss | Freeze RES | FRZΩ |
| 9 | CRIT | Silent RES | SILΩ |
| 10 | Evasion | Evasion |
| Attack | Defence | Utility | |
|---|---|---|---|
| 1 | Penetration | Elite DMG | Accuracy |
| 2 | Accuracy | Normal DMG | ATK |
| 3 | ATK | Boss DMG | HP |
| 4 | CRT% | HP | DEF |
| 5 | CRIT | DEF | CNTR |
| 6 | DMG vs Elite | Stun RES | STNΩ |
| 7 | DMG vs Normal | Silent RES | SILΩ |
| 8 | DMG vs Boss | Freeze RES | FRZΩ |
| 9 | CNTR | Acid RES | ACDΩ |
| 10 | Evasion | Evasion |
| Attack | Defence | Utility | |
|---|---|---|---|
| 1 | Penetration | Elite DMG | ATK |
| 2 | ATK | Normal DMG | CNTR |
| 3 | CNTR | Boss DMG | HP |
| 4 | Accuracy | HP | DEF |
| 5 | CRT% | DEF | Accuracy |
| 6 | DMG vs Normal | Stun RES | STNΩ |
| 7 | DMG vs Elite | Silent RES | SILΩ |
| 8 | DMG vs Boss | Freeze RES | FRZΩ |
| 9 | CRIT | Acid RES | ACDΩ |
| 10 | Evasion | Evasion |
| Attack | Defence | Utility | |
|---|---|---|---|
| 1 | Penetration | Elite DMG | ATK |
| 2 | ATK | Normal DMG | HP |
| 3 | CRT% | Boss DMG | DEF |
| 4 | CRIT | HP | CNTR |
| 5 | CNTR | DEF | STNΩ |
| 6 | DMG vs Elite | Stun RES | FRZΩ |
| 7 | DMG vs Normal | Freeze RES | SILΩ |
| 8 | DMG vs Boss | Silent RES | ACDΩ |
| 9 | Accuracy | Acid RES | Accuracy |
| 10 | Evasion | Evasion |